English
 русский
 中文简体
中文简体How to Bleed Brakes: Step-by-Step Guide for Every Method
2026-04-20
Content
- 1 What Bleeding Brakes Actually Does — and When You Need to Do It
- 2 Tools and Supplies You Need Before You Start
- 3 Understanding Automotive Brake Valves and Their Role in Bleeding
- 4 The Correct Bleeding Sequence — Starting Farthest from the Master Cylinder
- 5 Step-by-Step: How to Bleed Brakes with a Two-Person Method
- 5.1 Step 1: Prepare the Vehicle
- 5.2 Step 2: Check and Fill the Master Cylinder
- 5.3 Step 3: Loosen Then Re-Tighten All Bleeder Screws
- 5.4 Step 4: Attach the Catch Tube to the First Bleeder
- 5.5 Step 5: Pump and Hold
- 5.6 Step 6: Open the Bleeder Screw
- 5.7 Step 7: Close Before Releasing
- 5.8 Step 8: Repeat Until Clear
- 5.9 Step 9: Repeat on All Four Wheels in Sequence
- 5.10 Step 10: Final Check and Test
- 6 How to Bleed Brakes by Yourself — Three Solo Methods
- 7 Dealing with Stuck Bleeder Screws and Other Common Problems
- 8 Brake Fluid Types: Matching the Right Fluid to Your System
- 9 How Often Should You Bleed Your Brakes
- 10 Safety Reminders You Should Not Skip
What Bleeding Brakes Actually Does — and When You Need to Do It
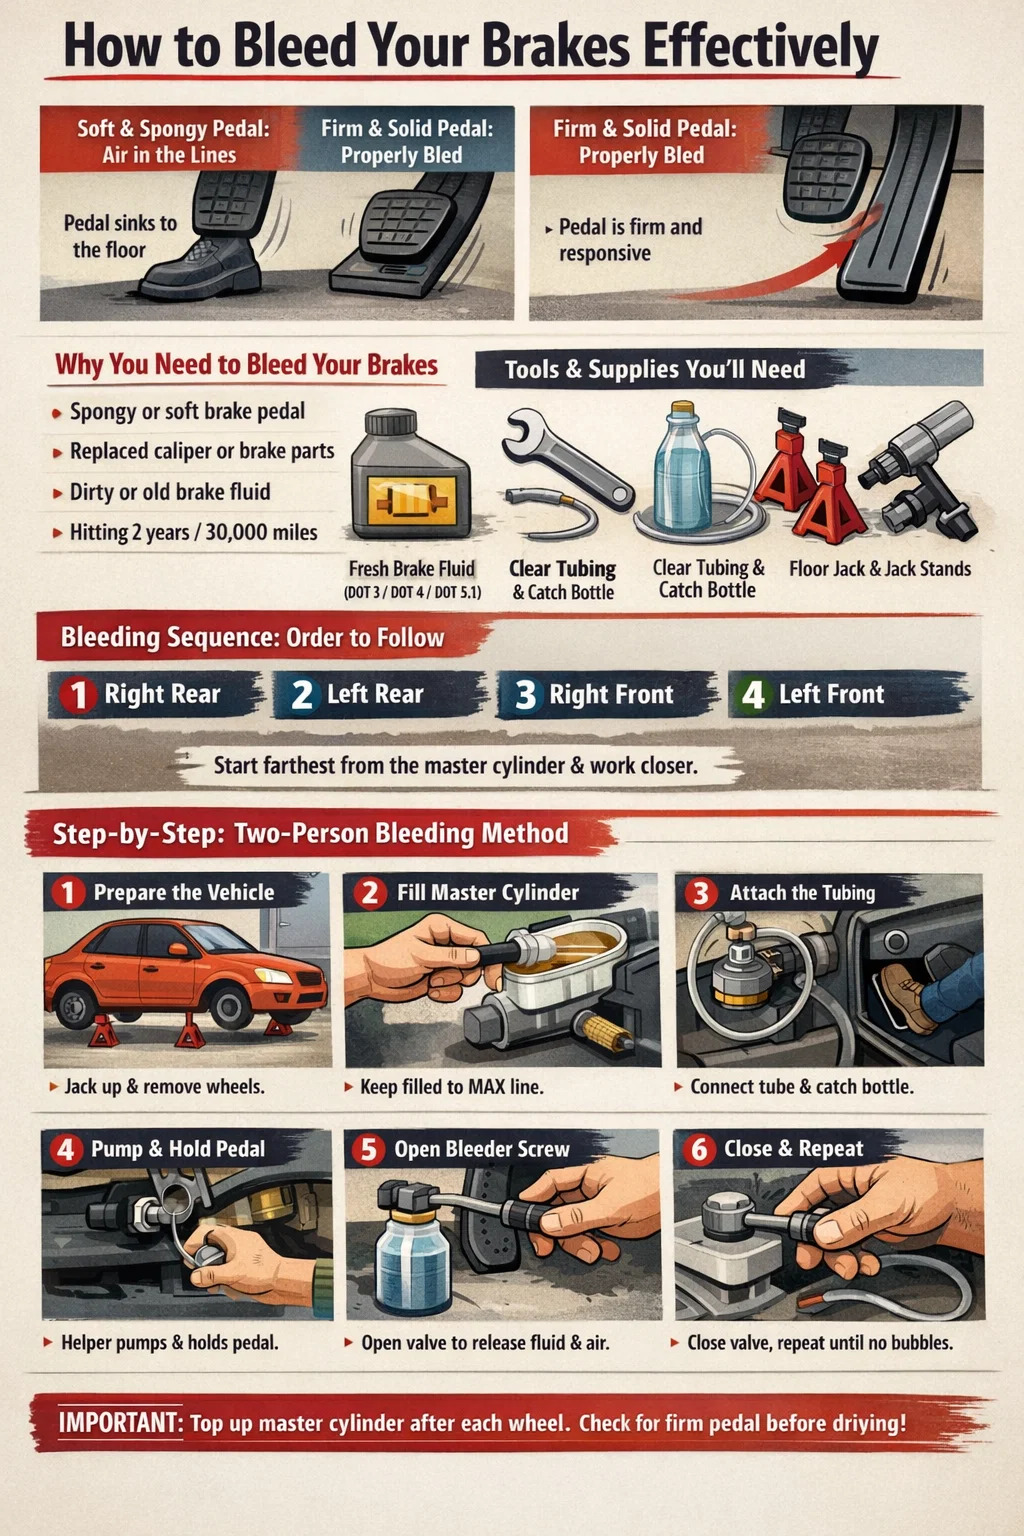
Bleeding your brakes means pushing old fluid and any trapped air out of the hydraulic brake lines until fresh, air-free fluid fills the system from master cylinder to caliper. The result is immediate: a firm, consistent pedal instead of a soft, spongy one. If you can press the brake pedal more than halfway to the floor before feeling solid resistance, there is almost certainly air in your lines, and bleeding is overdue.
Brake fluid is incompressible — that is how it transmits the force from your foot to the brake pads. Air is compressible. When air enters the lines, a portion of your pedal travel compresses that air pocket instead of clamping the calipers onto the rotors. Even a small bubble can increase stopping distance measurably. In extreme cases, enough vapor or air in the system can cause near-total brake failure under hard use.
You should bleed your brakes any time you:
- Notice a spongy, soft, or inconsistent pedal feel
- Replace a caliper, wheel cylinder, brake hose, or any other hydraulic component
- Let the master cylinder run dry during a brake job
- Find dark, milky, or contaminated fluid in the reservoir
- Hit the two-year or 30,000-mile mark without changing brake fluid
- Do any high-performance or track driving that heats fluid to near its boiling point
Brake fluid is hygroscopic — it absorbs moisture from the atmosphere even in a sealed system. Over time, that absorbed water lowers the fluid's boiling point significantly. Fresh DOT 3 fluid has a dry boiling point of around 401°F. Once it absorbs just 3.7% water, that drops to roughly 284°F. Under hard braking, fluid temperatures can easily exceed that threshold, turning water into steam and creating vapor lock — the same dangerous condition as having air in the lines.
Tools and Supplies You Need Before You Start
Getting organized before you start saves significant time and prevents mistakes. Running out of fresh brake fluid mid-bleed or losing track of the bleeder valve sequence can mean starting over entirely. Here is everything required for a proper brake bleed:
- Fresh brake fluid — confirm the correct grade (DOT 3, DOT 4, or DOT 5.1) from your owner's manual or the cap on the reservoir. Never mix types. Always buy sealed bottles; fluid absorbs moisture from open containers.
- A floor jack and a minimum of two jack stands rated for your vehicle's weight
- Wheel chocks for the wheels staying on the ground
- A box-end or bleeder wrench sized for your bleeder screws — typically 8mm, 10mm, or 11mm depending on vehicle
- Clear vinyl tubing, approximately 1/4-inch inner diameter, long enough to reach from the bleeder to a catch bottle held above caliper height
- A clean catch bottle or jar — pour an inch of fresh brake fluid in the bottom so air cannot be sucked back through the tube
- Penetrating oil such as WD-40 for any bleeder screws that are corroded or stuck
- Brake parts cleaner and clean shop rags for cleanup
- A helper, or a one-person bleed kit if working alone (discussed below)
One item many DIYers overlook is a proportioning valve bleeder tool. Vehicles with combination valves — common on older GM trucks, street rods, and many classic cars — use automotive brake valves that include a pressure differential shuttle. When you open one bleeder and pressure drops, this shuttle can trip, activating the brake warning light and unbalancing the system. A proportioning valve bleeder tool threads in where the brake warning switch sits and holds the valve shuttle in the centered position so bleeding proceeds without interruption.
Understanding Automotive Brake Valves and Their Role in Bleeding
Before getting into the bleeding sequence, it helps to understand how automotive brake valves control fluid distribution — because their design directly affects how you bleed the system and what can go wrong if you skip steps.
The Master Cylinder
The master cylinder sits under the hood, usually at the firewall on the driver's side. It converts mechanical pedal force into hydraulic pressure and feeds two separate circuits — typically front and rear, or a diagonal split on modern cars. It also houses the fluid reservoir. If this reservoir runs dry during bleeding, air enters from the top of the system and all previous work must be redone.
Proportioning Valves and Combination Valves
These automotive brake valves regulate pressure between the front and rear circuits to prevent rear wheel lockup during hard stops. A combination valve integrates a metering valve, a proportioning valve, and a pressure differential switch into a single unit. The differential switch is the piece that causes problems during bleeding: when pressure in one circuit drops, the shuttle inside the valve moves to detect the imbalance and illuminate the brake warning light. If it moves far enough, it can mechanically interfere with the bleed process. On vehicles with this type of combination valve — very common on trucks and classic cars built from the late 1960s through the 1990s — you need a proportioning valve bleeder tool to keep the shuttle centered while you work.
Bleeder Screws and Bleeder Valves
Each wheel has one bleeder screw — a hollow bolt with a tapered tip that seals when tightened. On disc brakes, the bleeder screw sits at the top of the caliper body. On drum brakes, it is on the upper portion of the wheel cylinder. The bleeder screw must be at the highest point of the caliper or cylinder so that air, which rises, can exit the system. If a caliper is installed incorrectly and the bleeder ends up at the bottom, air will remain trapped no matter how long you bleed. When you loosen this screw, fluid — along with any air bubbles — flows out through the center hole and down into your catch tube.
ABS Modulator Valves
Modern vehicles with anti-lock brake systems have an ABS modulator with its own network of solenoid valves and an accumulator. Air trapped in this unit cannot be removed with a standard pedal-push bleed. Many ABS-equipped vehicles require a scan tool to cycle the ABS pump and solenoids while bleeding, flushing fluid through every internal passage. If your vehicle has ABS and you have done major brake work — like replacing an ABS modulator, wheel speed sensor wiring, or caliper — consult the service manual before assuming a standard bleed is sufficient.
The Correct Bleeding Sequence — Starting Farthest from the Master Cylinder
Always bleed the wheel farthest from the master cylinder first and work toward the closest. On most vehicles with the master cylinder on the driver's side firewall, the sequence is: right rear → left rear → right front → left front. However, always cross-check with your owner's manual, because some vehicles use a diagonal split hydraulic circuit that requires a different order. Bleeding in the wrong sequence can drive air bubbles toward corners you have already finished, forcing you to repeat those wheels.
The logic is straightforward: air and old fluid need to travel the greatest distance to exit the system. Starting farthest away sweeps contamination progressively toward the master cylinder. By the time you finish the last wheel — the one closest to the master cylinder — every inch of brake line has been purged with fresh fluid.
| Step | Wheel | Distance from Master Cylinder | Notes |
|---|---|---|---|
| 1 | Right Rear | Farthest | Start here on most vehicles |
| 2 | Left Rear | Far | Second longest run of brake line |
| 3 | Right Front | Near | Passenger side front |
| 4 | Left Front | Closest | Driver's side, closest to master cylinder |
Step-by-Step: How to Bleed Brakes with a Two-Person Method
The two-person method is the most reliable way to bleed brakes. One person operates the brake pedal; the other manages the bleeder screws and monitors the fluid. Communication between both people at the right moments is what makes this work correctly.
Step 1: Prepare the Vehicle
Park on a flat, solid surface. Turn the engine off. Place wheel chocks around any wheel not being lifted. Jack up the vehicle and lower it onto jack stands — never work under a vehicle supported only by a floor jack. Remove the wheels for clear access to the calipers or wheel cylinders.
Step 2: Check and Fill the Master Cylinder
Open the hood and locate the master cylinder reservoir. Remove the cap and fill the reservoir to the MAX line with fresh, correct-grade brake fluid from a sealed bottle. Leave the cap loose so pressure can equalize during the process. Check the fluid level after every single wheel — if the reservoir runs dry at any point, air enters from the top and you must start over.
Step 3: Loosen Then Re-Tighten All Bleeder Screws
Before beginning the bleed sequence, go to each wheel and gently crack each bleeder screw about a quarter turn with your bleeder wrench. This confirms each one will break free when needed. If a bleeder screw is corroded and will not turn, apply penetrating oil, wait at least 30 minutes, then try again. Never force a stuck bleeder — the screw can snap inside the caliper, turning a straightforward job into an expensive repair. Once confirmed movable, re-tighten each bleeder before starting the sequence.
Step 4: Attach the Catch Tube to the First Bleeder
Start at the right rear wheel. Push one end of the clear vinyl tubing firmly over the bleeder screw so it fits snugly without leaking. Place the other end into your catch bottle, which should already have about an inch of fresh fluid in the bottom. Make sure the catch bottle sits above the height of the bleeder screw — this prevents air from traveling back up the tube into the caliper between pumping cycles.
Step 5: Pump and Hold
Have your helper sit in the driver's seat. With the bleeder screw still closed, instruct them to pump the brake pedal firmly several times until they feel solid resistance pushing back. Then tell them to hold steady pressure on the pedal and not release it under any circumstances until instructed.
Step 6: Open the Bleeder Screw
With your helper holding the pedal, open the bleeder screw approximately one half to three-quarters of a turn. Fluid will begin flowing through the tube and into the catch bottle. Your helper will feel the pedal drop toward the floor as pressure releases through the open bleeder. That is normal and expected. They must keep pressing down and must not release the pedal while the bleeder is open.
Step 7: Close Before Releasing
Have your helper call out immediately when the pedal approaches the floor. As soon as you hear the warning, close the bleeder screw before the pedal bottoms out. Never allow your helper to release the pedal while the bleeder is still open — doing so draws air back into the caliper, defeating the entire purpose of that bleed cycle. Only after the bleeder is fully closed should you tell your helper to release the pedal.
Step 8: Repeat Until Clear
Inspect the fluid in the clear catch tube for air bubbles. Repeat steps 5 through 7 — typically four to six times per wheel — until the fluid flowing out is clean, clear, and completely free of bubbles. Watch the color as well: old, contaminated fluid often appears dark amber or brown; fresh fluid should be nearly colorless or very pale yellow. Return to the master cylinder and top it up to the MAX line before moving to the next wheel.
Step 9: Repeat on All Four Wheels in Sequence
Work through the full sequence — right rear, left rear, right front, left front — repeating steps 4 through 8 at each wheel. Keep all other bleeder screws tightly closed while working on one wheel; open bleeders can allow air into circuits you have already finished. Top up the master cylinder after each wheel without fail.
Step 10: Final Check and Test
Once all four wheels are done, close every bleeder screw, fill the master cylinder to MAX, and reinstall the reservoir cap. Have your helper pump the brake pedal several times — it should build to a firm, solid feel within two or three strokes. If it still feels spongy, there is still air somewhere in the system. Check for any seepage around the bleeder screws, tighten if necessary, and repeat the bleed on whichever wheels still feel soft. Re-install the wheels, torque the lug nuts to the manufacturer's spec, lower the vehicle off the jack stands, and take a cautious test drive at low speed before returning to normal use.
How to Bleed Brakes by Yourself — Three Solo Methods
A helper is ideal but not always available. These three methods allow a single person to complete a full brake bleed without assistance. Each has practical tradeoffs in speed, cost, and required equipment.
Gravity Bleeding
Gravity bleeding requires no tools beyond a catch bottle and tube, but it is extremely slow — plan on at least one hour per wheel. Fill the master cylinder to MAX. Attach the catch tube to the first bleeder, open the screw about a half turn, and allow gravity to pull fluid down through the system at its own pace. The master cylinder must sit higher than the calipers for this to work, which it does on virtually all standard cars and trucks. Top off the reservoir regularly to prevent it from running dry. Once clear fluid flows with no bubbles, close the bleeder and move to the next wheel. This method works well for a routine fluid change when there is no urgent air problem to clear.
The Bleed Bottle Method
This is the fastest solo method and costs almost nothing to set up. Take a clean jar or bottle, drill a hole in the lid just large enough to press the catch tube through so it holds without slipping, then drill a second small air vent hole in the lid. Pour an inch of fresh brake fluid into the jar to submerge the tube end. Push the other end of the tube onto the bleeder screw. Open the bleeder, then pump the brake pedal from inside the vehicle several times. The fluid in the jar prevents air from re-entering through the tube between pump strokes. Once the fluid runs clear and bubble-free, close the bleeder before the pedal reaches the floor.
Vacuum Pump Bleeding
A handheld vacuum pump — available at auto parts stores for approximately $25 to $40 — connects directly to the bleeder screw and draws fluid out through suction rather than pushing it through pedal pressure. Fill the master cylinder, attach the vacuum pump to the bleeder, open the screw, and pull the handle until clear fluid flows. This method is fast and controllable, but watch the catch reservoir on the pump carefully — if it fills and you keep drawing, fluid can be sucked into the pump mechanism. Also top up the master cylinder frequently, as vacuum bleeding pulls fluid through quickly. One limitation: vacuum bleeds can sometimes introduce tiny air bubbles along the threads of the bleeder screw itself if the seal is not perfect, which can give a false impression of air still in the lines. Always follow up with a pedal check.
| Method | Approx. Time per Wheel | Cost | Best For |
|---|---|---|---|
| Gravity | 60–90 minutes | Near zero | Routine fluid refresh, mild contamination |
| Bleed Bottle | 10–20 minutes | Under $5 | General bleeding without a helper |
| Vacuum Pump | 5–10 minutes | $25–$40 | Fast flushes, regular maintenance |
Dealing with Stuck Bleeder Screws and Other Common Problems
Corroded bleeder screws are the number one frustration in brake bleeding. They are exposed to road salt, water, and heat cycling for years, and the threads can fuse to the caliper body so tightly that they snap before loosening. Here is how to handle this and other common issues without causing expensive collateral damage.
Stuck Bleeder Screws
Spray the base of the bleeder screw with penetrating oil and let it soak for a minimum of 30 minutes — an hour is better. Apply heat from a propane torch to the caliper body around the bleeder, not directly to the screw itself, to expand the metal and break the corrosion bond. Use a six-point box-end wrench or a purpose-made bleeder wrench rather than an open-end wrench, which rounds hex heads quickly. If the screw still will not move, stop. A snapped bleeder in a caliper means drilling out the remnant and re-threading the bore — or replacing the caliper entirely, which is far more costly than taking the vehicle to a shop for removal.
Brakes Still Feel Spongy After Bleeding
If the pedal remains soft after a complete bleed, there are four likely explanations. First, the master cylinder ran dry at some point and air entered from the reservoir — refill and repeat. Second, there is air trapped in the ABS modulator that requires a scan tool to cycle out. Third, a flexible brake hose has deteriorated internally and is ballooning under pressure, absorbing pedal travel. Fourth, the master cylinder itself is worn and bypassing fluid internally. Check the pedal under a sustained hold: if it slowly sinks to the floor with steady pressure applied, the master cylinder is the likely culprit.
Brake Warning Light Stays On After Bleeding
On vehicles with combination valve-type automotive brake valves, the pressure differential switch inside the valve may have tripped during bleeding if pressure between front and rear circuits became uneven. To reset it, briefly apply moderate brake pressure while the bleeder screws are all closed. In many cases this re-centers the shuttle and extinguishes the warning light. If the light persists, the switch itself may need replacement, or there is an actual pressure imbalance indicating a leak or damaged component in one circuit.
Fluid Leaking Around the Bleeder After Closing
A small seep around the base of a closed bleeder screw usually means the tapered tip is no longer sealing cleanly — either from cross-threading, corrosion pitting, or overtightening in the past. Replace the bleeder screw. These are inexpensive, typically under $3 each, and replacing a damaged bleeder is far better than leaving a slow leak that eventually introduces air or causes the caliper to run low on fluid pressure.
Brake Fluid Types: Matching the Right Fluid to Your System
Using the wrong brake fluid is a serious mistake. Different DOT grades are not interchangeable in all cases, and mixing incompatible fluid types can degrade seals, reduce boiling points, and cause brake failure. Here is a clear breakdown:
| DOT Grade | Dry Boiling Point | Wet Boiling Point | Base Chemistry | Mixable With |
|---|---|---|---|---|
| DOT 3 | 401°F (205°C) | 284°F (140°C) | Glycol ether | DOT 4, DOT 5.1 |
| DOT 4 | 446°F (230°C) | 311°F (155°C) | Glycol ether/borate | DOT 3, DOT 5.1 |
| DOT 5.1 | 500°F (260°C) | 356°F (180°C) | Glycol ether | DOT 3, DOT 4 |
| DOT 5 | 500°F (260°C) | 356°F (180°C) | Silicone | Nothing — do not mix |
DOT 3, DOT 4, and DOT 5.1 are glycol-based and can be mixed in an emergency, though best practice is always to flush the system with the correct grade. DOT 5 is silicone-based and completely incompatible with glycol fluids — mixing them produces a gel-like compound that can clog automotive brake valves, destroy seals, and cause complete brake failure. DOT 5 is uncommon in passenger vehicles and is primarily used in military and show cars that sit for extended periods, since silicone does not absorb moisture.
How Often Should You Bleed Your Brakes
Most manufacturers recommend replacing brake fluid every two years or 30,000 miles as a baseline, but the real answer depends on how you drive. A commuter driving moderate city roads in a dry climate can likely go the full two years. A driver who tows, hauls, or drives in mountainous terrain generating sustained high brake temperatures should consider annual fluid changes. Performance and track drivers should bleed between sessions, as a single hard track day can raise fluid temperatures high enough to absorb moisture aggressively.
An easy at-home check: brake fluid test strips, available at any auto parts store for a few dollars, measure moisture content in the fluid. A reading above 3% moisture is a strong signal to flush the system regardless of mileage or time elapsed. Fluid that appears dark, cloudy, or has visible particulate contamination should be replaced immediately rather than waiting for a scheduled interval.
Any time you open the hydraulic system for any repair — replacing a caliper, swapping brake lines, installing new automotive brake valves like a proportioning valve or combination valve — perform a full bleed as part of that job. There is no scenario where disturbing a hydraulic brake component does not warrant a subsequent bleed.
Safety Reminders You Should Not Skip
Brake work directly affects your ability to stop a vehicle. Cutting corners here carries real consequences. Keep these points in mind throughout any brake bleeding job:
- Never drive the vehicle until you have confirmed a firm pedal. A single hard stop revealing soft brakes on a public road is far worse than spending an extra 20 minutes confirming your work in the driveway.
- Brake fluid destroys painted surfaces almost instantly. Keep a bottle of water nearby and rinse any spills immediately.
- Dispose of waste brake fluid properly — most auto parts stores accept it. Do not pour it down the drain or into the trash; it is a regulated hazardous material in most regions.
- If the vehicle has ABS, EBD, or electronic brake-force distribution, confirm with the service manual whether a standard bleed is sufficient or whether a scan tool is required to cycle the modulator.
- Always use proper jack stands rated for your vehicle's weight. A floor jack alone is not a safe support for working under a vehicle.
- Brake fluid is mildly toxic and a skin irritant. Wear gloves and avoid prolonged skin contact.