English
 русский
 中文简体
中文简体How to Know If Your Safety Valve Is Bad?
2026-03-30
Content
- 1 The Short Answer: Key Signs Your Safety Valve Has Failed
- 2 What a Safety Valve Actually Does and Why It Fails
- 3 Seven Warning Signs That Your Safety Valve Is Bad
- 3.1 1. Continuous Dripping or Leaking from the Discharge Pipe
- 3.2 2. The Valve Fails the Manual Lift Test
- 3.3 3. Valve Chattering or Rapid Cycling
- 3.4 4. Visible Corrosion, Rust, or Mineral Deposits
- 3.5 5. System Pressure Remains High Despite Valve Presence
- 3.6 6. Water or Moisture Around the Valve Base or Threads
- 3.7 7. Age Beyond Recommended Service Life
- 4 How to Test a Safety Valve Step by Step
- 5 Safety Valve Failure Modes Compared
- 6 What Happens If You Ignore a Bad Safety Valve
- 7 Replacing a Bad Safety Valve: What You Need to Know
- 8 How Often Should Safety Valves Be Inspected and Replaced
- 9 Frequently Confused Issues: When It's Not the Safety Valve
- 10 Summary: The Fastest Way to Assess Your Safety Valve
The Short Answer: Key Signs Your Safety Valve Has Failed
A safety valve is bad when it leaks continuously, fails to open under excess pressure, opens below the set pressure point, or shows visible corrosion and physical damage. These are not minor maintenance issues — a faulty safety valve on a boiler, pressure vessel, or HVAC system is a direct safety hazard. In industrial settings, a failed pressure relief valve is one of the leading causes of catastrophic equipment failure and workplace injury. If your valve is dripping, weeping, chattering, or simply won't actuate correctly during a manual test, it needs immediate inspection or replacement.
The following guide walks through every meaningful symptom, test method, and replacement consideration so you can make an informed decision about the condition of your safety valve — whether it's on a residential water heater, a commercial boiler, a compressed air system, or an industrial pressure vessel.
What a Safety Valve Actually Does and Why It Fails
Before diagnosing failure, it helps to understand how the device functions. A safety valve — also called a pressure relief valve (PRV) or temperature and pressure relief valve (T&P valve) in water heating applications — is a mechanical device designed to automatically release pressure when it exceeds a predetermined safe limit. It acts as the last line of defense between normal operating conditions and a dangerous overpressure event.
The valve contains a spring-loaded disc or seat that holds the valve closed under normal pressure. When system pressure rises above the valve's set point — typically stamped directly on the valve body — the spring compresses, the disc lifts, and pressure is vented until conditions return to safe levels. Once pressure drops, the spring pushes the disc back onto the seat, resealing the valve.
Failure occurs through several well-documented mechanisms:
- Spring fatigue or corrosion weakening the closing force
- Mineral scale or sediment buildup preventing the disc from seating properly
- Corrosion of the valve body, seat, or disc from chemical exposure or moisture
- Mechanical damage from water hammer or repeated overpressure events
- Thermal degradation of seals in high-temperature applications
- Simple age — most safety valves have a recommended service life of 3 to 5 years for residential use and annual inspection intervals for industrial use
A safety valve that has never been tested or replaced after five or more years of service should be treated as suspect regardless of visible condition. Valves can appear intact externally while being completely inoperable internally.
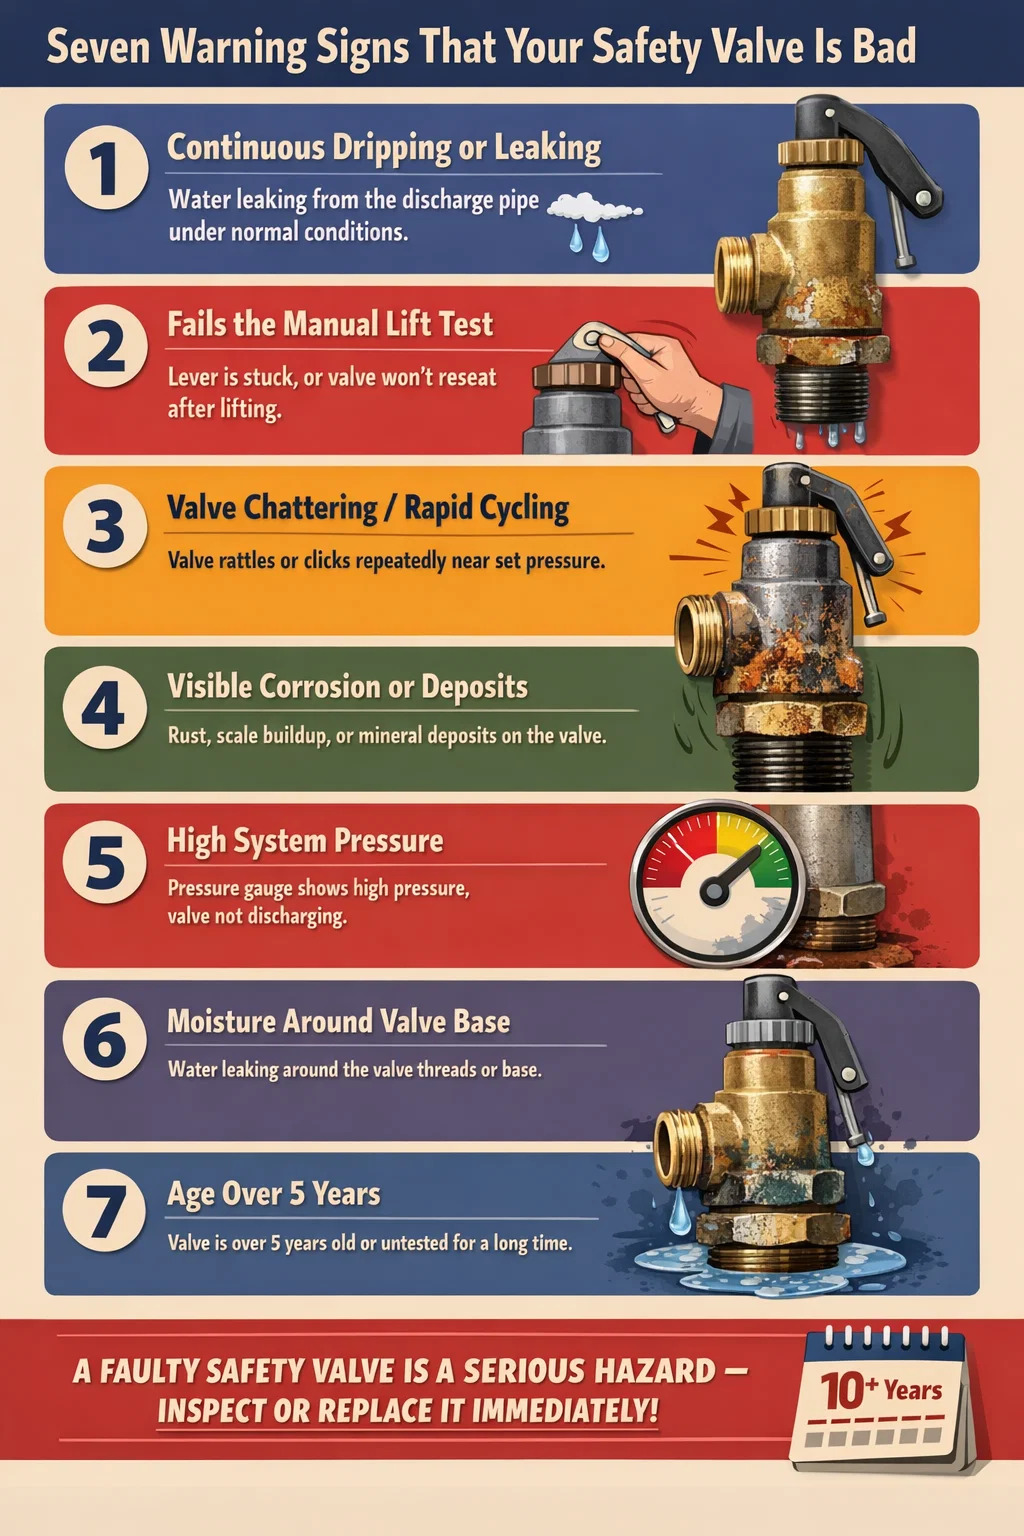
Seven Warning Signs That Your Safety Valve Is Bad
1. Continuous Dripping or Leaking from the Discharge Pipe
This is the most frequently observed symptom in residential water heaters and boilers. If you notice water dripping steadily from the discharge pipe connected to your T&P relief valve, the valve is not reseating properly. There are two possible causes: the system pressure or temperature is genuinely exceeding the valve's set point (in which case the valve is working correctly but the underlying system problem must be fixed), or the valve seat is fouled or damaged and leaking even under normal operating conditions.
To distinguish between the two, check the system pressure with a gauge. Most residential water heater T&P valves are rated at 150 psi and 210°F. If your pressure is within normal range (typically 40–80 psi for domestic water) and the valve is still dripping, the valve itself is the problem.
2. The Valve Fails the Manual Lift Test
Most safety valves on water heaters and boilers have a manual test lever — a small metal tab that you can lift to manually actuate the valve and verify it opens and closes. This is one of the simplest and most direct tests available. Lift the lever for approximately 3 seconds and then release it. You should hear a rush of water or steam being discharged, and then the valve should snap firmly closed when you release the lever.
If the lever feels stiff and nothing happens when you lift it, the valve internals may be frozen from corrosion or scale. If you lift it, water discharges, but then the valve continues to drip after you release it, the seat has been disturbed and the valve is now leaking. In either case — stuck open or stuck closed — the valve must be replaced immediately. A valve that won't open cannot protect against overpressure. A valve that won't close creates a continuous discharge hazard.
Note: On very old valves that have never been tested, performing the manual test can sometimes dislodge scale and cause the valve to begin leaking afterward. This is actually evidence that the valve was already compromised. Replace it rather than attempting repairs.
3. Valve Chattering or Rapid Cycling
Chattering describes the rapid, repeated opening and closing of a safety valve, producing a machine-gun-like clicking or rattling sound. This happens when the system pressure is hovering very close to the valve's set point, causing it to flutter open and closed repeatedly. While the valve itself may not be defective in this scenario, frequent chattering accelerates seat wear and causes the valve to degrade rapidly.
A valve that has experienced significant chattering should be inspected and likely replaced, because the repeated impact of the disc against the seat creates micro-damage that prevents proper sealing. The underlying pressure problem also needs to be resolved — an oversized valve relative to system capacity is a common cause, as is inadequate back pressure management in industrial piping systems.
4. Visible Corrosion, Rust, or Mineral Deposits
Examine the valve body and the area around the discharge pipe outlet. White, chalky deposits indicate calcium or limescale buildup from hard water — a strong sign that the valve has been weeping or discharging for some time without the problem being addressed. Orange or brown staining points to iron rust, which compromises the integrity of the valve seat and disc. Green deposits can indicate copper corrosion in systems with copper piping.
These deposits don't just indicate past leakage — they actively worsen the problem by creating rough, uneven seating surfaces that prevent the valve from closing cleanly. Any safety valve showing significant external corrosion or mineral crust should be replaced rather than cleaned, since the internal surfaces are almost certainly in a comparable or worse condition.
5. System Pressure Remains High Despite Valve Presence
If a pressure gauge consistently shows system pressure above the normal operating range, and the safety valve is not discharging, there are two concerning explanations: the system has a separate overpressure source that should be addressed, or the safety valve is stuck closed and failing to open when it should. A safety valve that refuses to open under genuine overpressure conditions is arguably more dangerous than one that leaks, because it allows pressure to continue building without relief.
This scenario is most common in systems where the safety valve has been left untested for years, allowing internal components to seize due to corrosion. Always cross-reference pressure gauge readings with the valve's set point rating (stamped on the valve body) to determine whether the valve should have actuated.
6. Water or Moisture Around the Valve Base or Threads
Moisture around the threaded connection where the valve screws into the boiler, water heater, or vessel can indicate thread failure, a degraded thread sealant, or micro-cracking of the valve body itself. This is distinct from the discharge pipe dripping and should not be confused with it. Dampness at the valve body threads suggests the valve casing is compromised, which is a structural failure mode.
Never attempt to re-tighten a safety valve body on a pressurized system. Depressurize and drain the system before attempting any work on the valve threads.
7. Age Beyond Recommended Service Life
Even if a safety valve shows none of the above symptoms, age alone is a legitimate reason for replacement. The American Society of Mechanical Engineers (ASME) and most valve manufacturers recommend replacing safety valves every 3 to 5 years in residential applications. Industrial and commercial safety valves should be tested and recertified annually, with replacement as indicated by inspection results.
A valve more than 10 years old that has never been replaced or tested has an unknown reliability and should be treated as non-functional for safety planning purposes. Internal spring degradation and seat corrosion progress invisibly over time and cannot be assessed from the outside.
How to Test a Safety Valve Step by Step
Testing a safety valve varies by application. The following procedure applies to the most common residential scenario — a T&P relief valve on a water heater — but the principles extend to other applications.
Before You Begin
- Confirm the discharge pipe directs water safely to a floor drain or outside — never into a location where scalding water could cause injury
- Have a replacement valve on hand before testing an old valve, in case it fails to reseat after actuation
- Wear appropriate protective gear — discharged water can be very hot
- Locate the valve's pressure and temperature rating on the label or stamp on the valve body
Manual Lift Test Procedure
- Locate the test lever on the side of the valve
- Lift the lever firmly and hold it up for 3 seconds
- Listen for water or steam being discharged through the pipe
- Release the lever and observe whether the valve stops discharging promptly and completely
- Wait 30 seconds and check the discharge pipe outlet for any continued dripping
Pass: Valve opened when lifted, discharged water or steam, and reseated cleanly with no dripping afterward.
Fail: Lever is seized and won't move, no discharge occurred, or valve continues to drip after release.
Pressure Testing for Industrial and Commercial Valves
For industrial pressure relief valves on boilers, compressors, or pressure vessels, a bench test or in-situ pressure test is the standard verification method. This involves applying a calibrated pressure source to the valve inlet and documenting the exact pressure at which the valve opens (called the "set pressure" or "pop pressure") and reseats. The acceptable tolerance is typically ±3% of the nameplate set pressure for valves above 70 psi, per ASME Section VIII standards.
Valves that open more than 3% below or above their rated set pressure are out of calibration and must be serviced or replaced. Documentation of safety valve testing is a regulatory requirement in most jurisdictions for commercial and industrial pressure equipment.
Safety Valve Failure Modes Compared
| Failure Mode | Observable Symptom | Risk Level | Recommended Action |
|---|---|---|---|
| Stuck closed (seized) | Won't actuate during manual test; high pressure without relief | Critical | Replace immediately |
| Stuck open (won't reseat) | Continuous discharge after actuation | High | Replace immediately |
| Seat leakage (weeping) | Slow drip from discharge pipe at normal pressure | Moderate–High | Replace; also verify system pressure |
| Chattering | Rapid clicking or rattling near set pressure | Moderate | Inspect and replace; fix root pressure issue |
| Opening below set pressure | Valve actuates before reaching rated pressure | Moderate | Replace or recalibrate |
| Body corrosion | Rust, scale, green deposits on body | Moderate | Replace; inspect surrounding piping |
| Age-related degradation | No visible symptoms; valve over 5 years old | Unknown / Elevated | Replace proactively; document replacement date |
What Happens If You Ignore a Bad Safety Valve
The consequences of operating a system with a faulty safety valve range from minor property damage to catastrophic failure with risk to human life. This is not an overstatement — pressure vessel failures are a documented and studied cause of industrial accidents worldwide.
Water Heater Explosion
A residential water heater without a functioning T&P relief valve can experience a boiling liquid expanding vapor explosion (BLEVE) if the thermostat fails in the open position and temperature rises unchecked. The result is a steam-driven explosion capable of launching the water heater through floors and ceilings, with the released energy equivalent to several sticks of dynamite. BLEVE incidents involving residential water heaters are rare precisely because T&P valves are required by code — but cases occur every year where valves have been deliberately removed, bypassed, or left in a failed state.
Boiler Overpressure Events
Commercial and industrial boilers operating without properly functioning safety valves are subject to strict regulatory oversight for good reason. An overpressure event in a boiler system can rupture pipes, destroy heat exchangers, and cause structural damage to the building housing the system. In steam boiler applications, the release of superheated steam at high pressure is immediately life-threatening to anyone in proximity.
Compressed Air System Rupture
Air compressor tanks are equipped with safety valves to prevent tank rupture from overpressure. A corroded or seized pressure relief valve on a compressor tank that is simultaneously experiencing a failed pressure switch creates conditions for tank failure. Air compressor tank ruptures produce shrapnel at lethal velocity and have been responsible for multiple fatalities in workshop and garage settings. OSHA records document these incidents annually, most involving old tanks with compromised or missing safety valves.
Property Damage from Continuous Discharge
Even without a catastrophic failure, a safety valve that weeps continuously will cause cumulative water damage to floors, walls, and the area around the equipment. In hard water regions, scale deposits from the discharged water can damage drain lines and floor coatings. The ongoing water loss also increases utility costs and can allow mold growth in areas with poor ventilation around the discharge pipe.
Replacing a Bad Safety Valve: What You Need to Know
Replacing a safety valve is a straightforward mechanical task on residential water heaters and small boilers, but requires careful attention to specification matching and proper installation technique.
Match the Replacement Valve Exactly
The replacement valve must match the original in three critical parameters:
- Pressure rating: The set pressure must match or be appropriate for the system's maximum allowable working pressure (MAWP)
- Temperature rating (for T&P valves): Must match or exceed the equipment's maximum temperature output
- BTU or flow capacity: The valve must be rated to relieve at least as much energy as the system can generate — undersized replacement valves are a common error
- Thread size and type: NPT thread size must match the existing port on the water heater or vessel
For residential water heaters, this information is typically stamped on the existing valve and listed in the equipment manufacturer's specifications. Standard T&P valves for residential water heaters are commonly rated at 150 psi / 210°F with a 3/4-inch NPT connection and BTU ratings ranging from 100,000 to 200,000 BTU/hr depending on tank size and heater output.
Installation Notes
- Always drain and depressurize the system before removing the old valve
- Clean the threaded port thoroughly and apply fresh PTFE thread seal tape (plumber's tape) to the new valve threads
- Do not overtighten — most manufacturers specify a torque in the 15 to 30 ft-lb range; overtightening can crack the valve body
- Ensure the discharge pipe is reinstalled correctly — it must terminate in a safe location, slope downward to allow drainage, and not be capped or plugged
- Perform a manual lift test after repressurizing to confirm the new valve opens and reseats correctly
- Label the valve with the installation date for future reference
In many jurisdictions, safety valve replacement on commercial or industrial pressure equipment must be performed by a licensed technician or boiler inspector. Check local codes before attempting this work in commercial settings.
Cost of Replacement
A residential T&P relief valve typically costs between $10 and $40 USD for the part itself. A licensed plumber performing the replacement will typically charge $100 to $300 including labor, depending on location and accessibility of the water heater. Industrial safety valves vary enormously in cost — a basic ASME-certified spring-loaded pressure relief valve for industrial service may range from $50 to several thousand dollars depending on size, pressure rating, and material of construction. Given the consequence of failure, this is one of the least cost-justified places to defer maintenance in any mechanical system.
How Often Should Safety Valves Be Inspected and Replaced
Inspection and replacement frequency depends heavily on the application, operating environment, and regulatory framework that governs the equipment.
| Application | Inspection Interval | Typical Replacement Interval | Governing Standard |
|---|---|---|---|
| Residential water heater (T&P valve) | Annually | Every 3–5 years | ANSI Z21.22 / local plumbing code |
| Residential boiler | Annually | Every 3–5 years or per condition | ASME CSD-1 / local boiler code |
| Commercial/industrial boiler | Annually or per jurisdiction | Per inspection results / 3–6 years | ASME Section I / NB-23 |
| Air compressor tank | Every 6–12 months | Every 2–3 years | Manufacturer spec / OSHA 1910 |
| Industrial pressure vessel | Annually or per risk analysis | Per API 576 inspection results | API 576 / ASME Section VIII |
For high-corrosion environments — including systems using aggressive chemicals, high-chlorine water, or high-humidity air — inspection intervals should be shortened and visual checks performed quarterly at minimum. The actual condition of the valve at the time of inspection should always take precedence over a calendar-based replacement schedule. A valve showing signs of corrosion at two years should be replaced at two years, not deferred to the five-year schedule.
Frequently Confused Issues: When It's Not the Safety Valve
Not every pressure-related symptom points directly to the safety valve itself. Understanding what else can cause similar symptoms helps you avoid unnecessary replacements and ensures the real problem gets fixed.
Thermal Expansion in Closed Systems
In homes with a pressure-reducing valve (PRV) on the water supply, the water system becomes effectively closed — expanding water heated in the tank has nowhere to go except up in pressure. If no expansion tank is installed, the T&P relief valve will open periodically to relieve this thermal expansion pressure, causing intermittent dripping that looks like valve failure. In this scenario, the safety valve is functioning correctly — the fix is installing a thermal expansion tank, not replacing the relief valve.
Excessive Supply Pressure
Municipal water supply pressure above 80 psi is common in some areas and can cause the T&P valve to weep if it approaches the valve's rated set pressure. The solution is adjusting or replacing the incoming pressure-reducing valve, not the T&P valve itself. Check your supply pressure at an outdoor hose bib with a simple gauge — they're available for under $15 at any hardware store.
Condensation on Cold Pipes
In humid environments, condensation on cold water supply pipes near the water heater can create puddles on the floor that are mistaken for valve discharge. Touch the discharge pipe after a period of heater operation — if it's wet but the water is cold and the pipe itself is cold, you're likely dealing with condensation rather than valve discharge.
Faulty Pressure Gauge
In industrial and commercial systems, a pressure gauge showing elevated readings may itself be defective rather than the pressure being genuinely high. Before condemning a safety valve for failing to open at apparent overpressure, verify the gauge reading with a second, calibrated gauge. Pressure gauges are wear items that require periodic recalibration and replacement as well.
Summary: The Fastest Way to Assess Your Safety Valve
If you're looking for a quick checklist to run through right now, here is a direct assessment sequence:
- Look: Is there any dripping, moisture, scale, or rust on or around the valve body and discharge pipe? If yes — inspect further or replace.
- Listen: Is there any chattering, hissing, or clicking from the valve during normal operation? If yes — inspect and likely replace.
- Test: Perform the manual lift test. Does it open freely and reseat cleanly? If not — replace.
- Date: When was it last replaced? If over 5 years ago or unknown — replace proactively.
- Pressure-check: Is system pressure consistently within the normal operating range for your equipment? If not — address the system pressure issue first, then re-evaluate the valve.
A safety valve is a small, inexpensive component relative to the equipment it protects and the consequences of its failure. When in doubt, replace it. The cost of a new valve is trivial compared to the potential cost — financial and otherwise — of operating without one that works.